In Sights and Sounds of the Seasons we were inspired by this fabulous art lesson from Deep Space Sparkle of Torn Paper Owls. To begin, I read excerpts from Owl Moon by Jane Yolen, which tells the story of a girl who goes owl sighting with her father on a cold winter's night to see her first owl.
As we enter a time of more nighttime, owls are more likely to be spotted since they hunt at night since most are nocturnal. We learned about different features of owls that make them unique including their huge, staring eyes and their little ears that provide them with their keen hearing. The children also agreed that while they're cute, owls can be quite scary, especially since they have the ability to fly almost silently. We talked about how their soft flight feathers muffle the sound of their wings making them excellent nighttime hunters.
This project was completed in one hour and used the following materials:
18"x12" Dark Blue Construction Paper
Oil Pastels-white, yellow, and black
Scraps of owl colors-brown, gray, white, black, orange, yellow
Precut circles in various sizes for the eyes (older students can cut their own!)
White glue
Scissors
1. To begin students learned how suprisingly simple it was to draw an owl. With black pastel start with two large circles for the eyes, add a triangle beak, then a head with little pointy ears. Next add a large "U" for the body, and then legs and talons (the students loved this word!). The wings can be drawn spread out in flight or perched. A branch could be added if the students wanted to.
2. White and yellow oil pastels were used to add stars, a moon, and/or clouds to the dark blue sky.
3. Owl colored paper scraps were torn to make up the feathers of the owl. We did the body and head the same color first, then the wings a different color (this helps them stand out). Glue was added to the areas in sections and the feathers were added to cover all the blue paper.
4. Next students selected 3 different sized circles for the eyes (some chose to cut their own out). These were layed with the smallest on the top and largest on the bottom. The eyes are the most important part of the owl so they have to stand out!
5. Beaks and legs were either cut or torn and then glued on. The branch was also covered in torn paper at this time.
The students had a blast creating these very special owls and were proud to show them to their parents!
Tuesday, November 16, 2010
Friday, October 22, 2010
Mexican Marigolds
In Journey Around the World, 4-7 year olds visited Mexico, where we learned about the annual Day of the Dead celebration or "Día de los Muertos." Marigolds are an important flower during this time as they keep the celebrations welcoming and joyful for all involved.
This project took two 1 hour classes and used the following materials:
White Tag Board 12"x18"
Blue Construction Paper 12"x18"
Tempera Paint-red, orange, yellow, pink, metallic gold (warm colors)
Paint Shaper Combs
Sequins
Green Construction Scraps
Warm Construction paper 9"x12"
Oil Pastels (warm colors and black)
Scissors, Glue, Paintbrushes
On the first day students began by dividing their tag board into thirds while the paper is in the horizontal position (this just has to be approximate). Next warm colored tempera paint, various paint shaper combs, brushes, and sponges were provided. Students painted the first section mostly red (they could add orange or gold), the second orange, and the third seciton yellow. We emphasize trying to create unique textures in each section of these painted papers. These were set aside to dry for the next class.
Next students chose a piece of warm colored construction paper and drew a vase form of their choice. Students were to make sure their vase was large and took up most of the paper. These were cut out and then oil pastels in warm hues were used to add a simple geometric or line pattern. These were glued to the bottom portion of the blue construction paper (the blue is in vertical /portait position)
The next class students began making Mexican Marigolds--they had a blast and learned some great new cutting skills.
First the painted paper was cut into 3 parts, one of each color. Then each color was cut in half to get 6 squares total, two of each color. I showed them how to "round out the corners" to create a circle.
From there students were free to cut, shape, and tear their circles to create petals. They could cut notches, fringe, rounded petals, spikes...Whatever they wanted. The goal was to create 3 separate flowers, each with at least 3 colors and layers. Smaller circles were cut for the centers and extra layers of the fluffy marigolds.
Tacky glue was used to add shiny sequins to the centers to jazz these amazing flowers up (Not that they needed it!)
The last step was to use various shades of green construction to create a stem and leaves for each flower. The flowers, stems and leaves were all glued onto the blue construction so they filled the vase.
This project makes a great display for fall, as it is colorful, cheerful and had bold fall colors. It's really not as complex as it sounds--all the steps are simple!
Labels:
Ages 4-7,
Ages 7-10,
Collage,
Day of the Dead,
Fall,
Flowers,
Multicultural,
Warm Colors
Tuesday, September 28, 2010
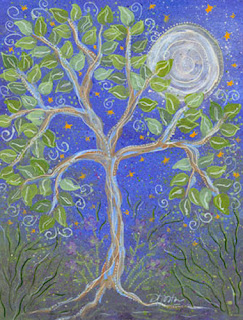
If I Were a Tree
Before starting this mixed media project, we read one of my favorite books,
"If I Were a Tree" by Dar Hosta
As you can see the illustrations are lovely and are made by collaging colorful papers and adding metallic embellishments. This would be a great project to do with painted papers, but we chose to stick to acrylics on canvas boards to save time. Before starting, children were asked "If you were a tree, what kind of tree would you be," which is the main thematic line of this story. They sketched their tree designs and began painting with acrylics. After these paintings dried, metallic paint markers and shiney paper collaging was used to add a whimsical touch. Enjoy our fantastic trees.
Labels:
Acrylic Paintings,
Ages 7-10,
Literature,
Tree
Sunday, March 7, 2010
Monday, February 15, 2010
Winter Snowmen Paintings
In Sights and Sounds of the Seasons we celebrated the winter snow by building our own indoor snowmen. Rather than drawing and painting a traditional 3 ball snowman, we took on the challenge of painting closeup snowman in a profile view.
First: The snowman was drawn with black oil pastels making sure it was cropped of either side of the blue paper. Eyes, Nose, Mouth, Buttons, and Arms came next. Students designed their own hats and scarves to add to their snowmen.
Second: Use temperas to paint everything on the snowman that wasn't white (hats, eyes, scarves....Carrots!)
Third: Next white painted was added to the snowman. Now it's time to let it snow by painting fluffy snowflakes.
Last : We retraced our black lines to ensure our snowmans don't get lost in the winter blizzard.
Enjoy!
Chloe Aidan
Eddie Gaia
Jack Jake
Maddy Luke
Meredith Meghan
Victoria Nicholas
Yula
Subscribe to:
Posts (Atom)