In Sights and Sounds of the Seasons we talked about the popular saying,

Showing posts with label Ages 4-6. Show all posts
Showing posts with label Ages 4-6. Show all posts
Sunday, March 7, 2010


Monday, February 15, 2010
Winter Snowmen Paintings
In Sights and Sounds of the Seasons we celebrated the winter snow by building our own indoor snowmen. Rather than drawing and painting a traditional 3 ball snowman, we took on the challenge of painting closeup snowman in a profile view.
First: The snowman was drawn with black oil pastels making sure it was cropped of either side of the blue paper. Eyes, Nose, Mouth, Buttons, and Arms came next. Students designed their own hats and scarves to add to their snowmen.
Second: Use temperas to paint everything on the snowman that wasn't white (hats, eyes, scarves....Carrots!)
Third: Next white painted was added to the snowman. Now it's time to let it snow by painting fluffy snowflakes.
Last : We retraced our black lines to ensure our snowmans don't get lost in the winter blizzard.
First: The snowman was drawn with black oil pastels making sure it was cropped of either side of the blue paper. Eyes, Nose, Mouth, Buttons, and Arms came next. Students designed their own hats and scarves to add to their snowmen.
Second: Use temperas to paint everything on the snowman that wasn't white (hats, eyes, scarves....Carrots!)
Third: Next white painted was added to the snowman. Now it's time to let it snow by painting fluffy snowflakes.
Last : We retraced our black lines to ensure our snowmans don't get lost in the winter blizzard.
Enjoy!


Chloe Aidan


Eddie Gaia


Jack Jake


Maddy Luke


Meredith Meghan


Victoria Nicholas

Yula
Thursday, December 17, 2009
Wintertime Birdhouses
In Sights and Sounds of the Seasons we discussed how birds survive the brutal cold winters here in Pennsylvania. Some birds, like geese, migrate south to warmer climates. Some birds stay here and often choose birdhouses to stay warm.

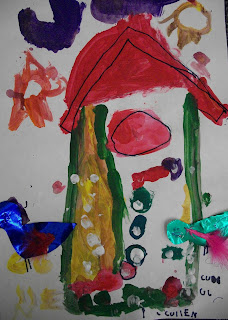


- To start, sharpies were used to draw a birdhouse and any decorations for the house (perch, hole, roof)
- Next the children used colorful tempera paints to paint their birdhouses.
- The next class students used colorful papers, feathers, and buttons to create birds to live in their special birdhouses.
- Lastly, we used our figures to add crisp, white snow to our pictures. Enjoy!

Eddie

Cullen

Jack

Chloe

Meredith

Maddy

Aidan

Megan

Miss Vanessa
Millie's Marvellous Hat!
In Art Through Children's Literature we read Satoshi Kitamura's Millie's Marvellous Hat. In this book, Millie cannot afford a beautiful feather hat that she sees in a store window. The clerk remembers that he has a special one that's perfect for her budget. This imaginary hat can be any size, shape, or color that she prefers. As she walks down the street wearing it, Millie is inspired. Soon she has a hat like a peacock, then a cake, next a flower, and then a fountain.

Children were inspired to use their own imaginations to create a hat that displayed their very favorite things.
First: Using white paper and black sharpies, students drew a simple portrait of themselves. We chose to keep the portraits simple and black and white so the colorful hats could take center stage. Another option would be to cut the face out of the white paper, glue it to black and then add the hat. That's how I'd do them next time!
Second: Next using various colored paper, metallic paper, sequins, feathers, tissue paper, and buttons, children were free to create their very own special hat. Below are some examples of this fun, imaginative project.


Children were inspired to use their own imaginations to create a hat that displayed their very favorite things.
First: Using white paper and black sharpies, students drew a simple portrait of themselves. We chose to keep the portraits simple and black and white so the colorful hats could take center stage. Another option would be to cut the face out of the white paper, glue it to black and then add the hat. That's how I'd do them next time!
Second: Next using various colored paper, metallic paper, sequins, feathers, tissue paper, and buttons, children were free to create their very own special hat. Below are some examples of this fun, imaginative project.

Kenna

Eddie

Chloe

Aidan

Luke

Victoria

Jack

Maddy


Megan

Nicholas
Monday, November 23, 2009
Mixed Media Scarecrows
In Sights and Sounds of the Seasons we created fabulous mixed media scarecrows to celebrate fall harvest. First, we discussed how scarecrows are used to prevent crows and other animals from eating a farmer's crop. We also talked about how many families make (or buy) scarecrows as decorations during the Autumn season. This project took two 1 hour classes, but make take longer depending on the student age and size of the watercolor paper.
Supplies include:
11"x 15" watercolor paper
Watercolors-pan or even better... liquid!
Craft Sticks
Patterned Paper and/or leftover painted paper
Construction paper
Raffia
Googly Eyes
Buttons
Sharpies
1: We began this project by using watercolors to paint a farm scene of crop fields and a blue sky. Each hill was filled with bountiful fruit and vegetable crops.
2. We also constructed a simple scarecrow "skeleton" using craft sticks and glue, which we would dress the following week. Use two sticks for the head and body, and then add arms and legs.
3. We continued this project the following week by focusing on giving our scarecrows clothing and a personality. Students cut out pants, shirts, dresses, hats, patches, and faces using their skeleton as a template. We use construction paper, patterned paper and some leftover painted papers.
4. After our scarecrows were well dressed, we added googly eyes, raffia, and buttons. Finally the scarecrows were glued onto their painted backgrounds. Below are some of the fantastic results.


Eddie Cullen


Beth Karlee

Seth


Aidan Adric


Gaia Chloe


Levi Maddie


Megan Meredith

Miss Vanessa
Thursday, October 29, 2009
Giraffes Can't Dance!
In Art Through Children's Literature we read a humorous and heartwarming story called Giraffes Can't Dance by Giles Andreae. This book tells of the story of a clumsy giraffe named Gerald who's legs are too skinny. The jungle is hosting a dance, and all of the other animals can do the tango, the waltz, and really groove. Gerald isn't the best dancer and the other animals tease him and this makes him very sad. A kind cricket plays Gerald some special music, and he realizes that sometimes if you're different, you just need a different song.
This story sends out a great message that you can excel and enjoy who you are even if, at first, the world does not play your tune. Additionally, it ecourages the validation and acceptance of a child who feels different--which is always a great message! Dance on!

Day two:


This story sends out a great message that you can excel and enjoy who you are even if, at first, the world does not play your tune. Additionally, it ecourages the validation and acceptance of a child who feels different--which is always a great message! Dance on!

Supplies:
White sulphite paper 12"x18" and 9"x12"
Colored Pencils
Tempera paint: blue, purple, white, green, yellow
Black Sharpies
Scissors
Glue Sticks
This project was completed in only two one hour sessions!
1. We began by creating a fabulous nighttime background for our giraffes to dance in. First using cups, we traced a moon on 12"x18" white sulphite paper with a pencil. Then in the bottom portion we drew a ground line where the grass would be/
2. Next we used purple, blue, and turquoise tempera paint to add a luxurious night sky. We painted everything but the moon and grass.
3. We painted the moon white and then swirled the paint outwards to make the moon glow into the night sky. We even added a few stars.
4. Then we painted the grass yellow. We counted to 100 together to allow the yellow to dry and then added green paint on top. We turned our brushes upside down and use the ends to scratch in some grass texture. Some students were not present during this part, therefore, they used oil pastels on black paper to create their nighttime backgrounds.
Day two:
1. The next class we tackled the daunting task of learning how to draw a dancing giraffe. We started with a simple oval shape for the belly. I demonstrated how to make the giraffe dance in two poses, standing and doing a somersault. Basically as long as the giraffe had 4 skinny legs, a long neck, and spots you were on the right track!
2. After drawing our dancing giraffes, we colored them with colored pencils using mostly yellow and orange. We outlined details like eyes, mouths and hooves in black sharpies.
3. We carefully cut them out and glued them to our backgrounds.
Here are our dancing giraffes--the children are so proud of these!


Jake Eddie


Chloe Victoria


Gaia Megan


William Yula


Luke Maddie


Adric Meredith


Nicholas Miss Vanessa
Subscribe to:
Posts (Atom)